Pages

Kamis, 30 Januari 2025

How to Build a Durable Outdoor Shed – Free Plans

Building Your Dream Outdoor Shed: Free Plans & Easy Steps

Hey there, fellow DIY enthusiasts! So you're dreaming of a sturdy, reliable outdoor shed â€" a place to stash your gardening tools, store firewood, or even set up a cozy workshop. Building one yourself is incredibly rewarding, and I'm here to walk you through it. Forget those expensive pre-fabricated sheds! We're going to build something amazing, and best of all, I'm sharing free plans to help you along the way.

Planning Your Shed Masterpiece

Before we even think about grabbing a hammer, let's get organized. This is the most important step, trust me! A little planning upfront saves headaches down the line.

1. Choosing the Right Location:

Think about sunlight, access, and drainage. You'll want a level spot with good drainage to prevent water damage. Easy access is key â€" you don't want to be lugging heavy things across your entire yard. Consider how much sunlight the area receives; too much sun can warp wood, while too little can create a damp environment.

2. Size Matters:

How much space do you really need? Don't overestimate! A smaller, well-organized shed is often better than a huge, cluttered one. Measure your belongings and plan accordingly. Remember to factor in space for walking around comfortably inside.

3. Sketching Your Vision:

Even a rough sketch is helpful. Draw your shed from different angles, noting the dimensions. This will be your blueprint, so take your time. Consider adding features like shelves, windows (for ventilation and light!), and even a workbench if you're planning a workshop.

4. Gathering Your Materials:

This is where those free plans really shine! Once you've decided on your shed's dimensions and features, you can use the plans (provided below â€" I'll get to those soon!) to create a detailed list of materials. This includes:

  • Pressure-treated lumber for the base and frame (essential for durability!)
  • Plywood or OSB (Oriented Strand Board) for the walls and roof
  • Roofing materials (shingles, metal, etc.)
  • Fasteners (nails, screws, and possibly bolts)
  • Door hardware
  • Window hardware (if applicable)
  • Concrete or gravel for the foundation (depending on your shed's size and local regulations)
  • Paint or sealant (optional, but recommended to protect the wood)

Building the Foundation: A Solid Start

The foundation is crucial for a long-lasting shed. A wobbly base leads to all sorts of problems down the line. There are several ways to build a foundation:

1. Concrete Slab:

This is the most robust option, especially for larger sheds. It requires a bit more work, but it’s well worth it for stability and longevity. You'll need to dig a hole, pour in a concrete mixture and ensure it's level before proceeding with the frame construction.

2. Gravel Base:

A simpler and less expensive option, especially suitable for smaller sheds. This involves digging a base, adding a layer of gravel for drainage, and then leveling it out. Make sure to use landscaping fabric to prevent weeds from growing through.

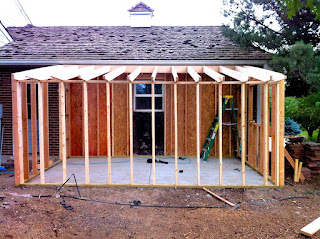
Constructing the Frame: The Shed's Skeleton

With the foundation ready, it’s time to build the frame. This is where your free plans will become your best friend.

1. Cutting the Lumber:

Carefully measure and cut the lumber according to your plans. Use a saw (a circular saw or miter saw will make this easier) and make sure your cuts are precise. Accurate cuts translate to a well-built and square structure.

2. Assembling the Walls:

Follow the plans to assemble the wall frames. Make sure everything is square and plumb (perfectly vertical) using a level. Use appropriate fasteners â€" construction screws are often preferred over nails for added strength.

3. Raising the Walls:

This part often requires a helper. Carefully raise the walls and secure them temporarily. Check again for squareness and plumbness before permanently fastening them together.

4. Constructing the Roof:

The roof is another crucial part. The plans will guide you in creating the roof trusses (the triangular supports). Make sure they are properly braced and that the roof has adequate slope for water runoff.

Sheathing and Roofing: Protecting Your Investment

Now for the finishing touches!

1. Sheathing the Walls and Roof:

This involves attaching the plywood or OSB sheathing to the frame. Make sure the sheets are properly aligned and secured. This provides a solid surface for the roofing and siding.

2. Applying the Roofing Material:

Choose your roofing material carefully â€" shingles, metal, or even corrugated plastic sheets are common choices. Follow the manufacturer's instructions for proper installation. Ensure the roof is watertight.

Finishing Touches and Free Plans

Almost there! Here are the last steps:

  • Install the doors and windows: Carefully measure and install the doors and windows following the manufacturer's instructions. Ensure they are securely fastened and operate smoothly.
  • Add any interior features: Shelves, workbenches, or hooks will transform your shed from a simple storage space into a functional area.
  • Apply a protective finish: Paint or wood sealant will protect your shed from the elements and enhance its aesthetic appeal.

And now, the moment you've been waiting for â€" the free plans! Unfortunately, I can't physically provide plans within this text format. However, I strongly suggest searching online for "free shed plans" on sites like Pinterest, Instructables, and various woodworking blogs. Many dedicated DIY websites offer detailed plans for different shed sizes and styles. Just make sure to select plans that match your skill level and available resources.

Commonly Asked Questions

Q: How long does it take to build a shed?

A: It depends on the size and complexity of the shed, as well as your experience. A smaller, simpler shed might take a weekend for experienced builders, while a larger, more complex one could take several weeks.

Q: Do I need building permits?

A: Check with your local building department. Many areas require permits for structures of a certain size. It's better to be safe than sorry!

Q: What kind of tools do I need?

A: You'll need basic carpentry tools such as a measuring tape, level, saw, hammer, drill, screwdriver, and possibly a nail gun. For a more robust shed, power tools such as a circular saw, miter saw, and drill with different bits would be helpful.

Q: Can I build a shed without any prior experience?

A: Yes, you absolutely can! Start with a smaller, simpler shed design and take your time. There are plenty of online resources and tutorials to guide you through every step of the way. Don't be afraid to ask for help from experienced friends or family members.

Happy building! Remember, the most important thing is to enjoy the process. Building your own shed is a truly rewarding experience!

Read More..

DIY Cabin Shed Plans – Free Small House Blueprints

DIY Cabin Shed Plans â€" Free Small House Blueprints

Hey there, fellow DIY enthusiasts! Dreaming of a cozy cabin getaway or a charming backyard shed? You've come to the right place! Building your own structure can be incredibly rewarding, and I'm here to walk you through the exciting world of free small house and cabin blueprints. Forget expensive contractors and confusing jargon â€" let's build something amazing together, one step at a time.

Why Choose a DIY Cabin or Shed?

There are tons of reasons why building your own cabin or shed is a fantastic idea. First off, it's a money saver! Building materials are a significant portion of the cost, but you're eliminating hefty labor fees. Secondly, it's incredibly satisfying. There's nothing quite like seeing your vision come to life with your own two hands. Finally, you get complete control over the design, materials, and even the quirky little details that make it uniquely yours. Think custom shelving, a specific window placement, or even that charming little porch swing you've always wanted.

Finding Free Small House Blueprints

The internet is a treasure trove of free plans, but finding the right ones can feel overwhelming. Here's what to look for:

Understanding the Plans

Before you download anything, make sure you understand the plan's scale, materials list, and the level of detail provided. Some plans are extremely detailed, showing every cut and nail. Others are more conceptual, offering a general layout and dimensions. Choose a plan that matches your skill level â€" don't bite off more than you can chew!

Reliable Sources

Look for plans from reputable sources like woodworking forums, established DIY websites, and even some architectural student portfolios (with their permission, of course!). Be wary of sites that seem too good to be true â€" free plans should still be well-designed and safe. Always check the comments section to see if other people have built the project successfully.

Types of Plans Available

You'll find various styles, including:

  • A-frame cabins: These charming structures are known for their simple, iconic design and are perfect for a rustic getaway.
  • Simple shed plans: Ideal for storage, workshops, or even a small home office.
  • Tiny house plans: Though often more complex, these designs are perfect for those looking to downsize or create an off-grid living space.
  • Log cabin plans: If you're feeling adventurous, these designs offer a truly rustic and unique look. Requires specialized knowledge of log building techniques.

Essential Steps Before You Start Building

Before you even think about touching a saw, take these crucial steps:

1. Check Local Building Codes and Permits

This is crucial! Depending on your location, you might need permits to build a shed or cabin. Contact your local building department to check the regulations and avoid potential fines. It might seem like an extra step, but it saves a lot of headaches down the line.

2. Gather Your Tools and Materials

Make a comprehensive list of all the tools and materials needed. Don't just rely on the plan’s list â€" you might need additional things like safety equipment, clamps, measuring tapes, and various hand tools. Creating a detailed list and checking off items as you acquire them is key.

3. Prepare Your Building Site

Clear the area, level the ground, and ensure you have adequate access for materials and equipment. Consider drainage and proper foundation preparation â€" a solid foundation is crucial for a lasting structure.

4. Understand the Plan Thoroughly

Don't just skim it! Take the time to study the blueprints, understand the assembly process, and familiarize yourself with all the parts. If anything is unclear, don't hesitate to seek clarification online or from experienced builders.

Building Your Cabin or Shed: Tips and Tricks

Building anything takes patience and attention to detail. Here are some helpful tips:

  • Take your time: Rushing the process increases the chance of mistakes.
  • Double-check measurements: Accuracy is paramount in construction.
  • Use quality materials: This will ensure the longevity of your structure.
  • Ask for help when needed: Don't be afraid to ask for assistance from friends or family.
  • Celebrate small victories: Each completed step brings you closer to your goal.

Remember, building a cabin or shed is a learning process. Embrace the challenges, learn from your mistakes, and enjoy the journey. The sense of accomplishment you'll feel when it's complete is incredibly rewarding.

Frequently Asked Questions (FAQs)

Here are some questions I often get asked about DIY cabin and shed building:

Q: What's the best wood to use for a cabin or shed?

A: Treated lumber is often recommended for its durability and resistance to rot and insects. Pressure-treated pine is a popular and relatively affordable choice. However, cedar and redwood are also excellent options, known for their natural resistance to decay, but they are more expensive.

Q: How long does it take to build a small cabin or shed?

A: This highly depends on the size and complexity of the project, your experience, and the number of people helping. A simple shed could take a weekend, while a more complex cabin could take several weeks or even months.

Q: Can I modify the free blueprints?

A: Usually, yes. However, any significant modifications could compromise the structural integrity, so it's important to have a good understanding of construction principles before altering the plans. If you're unsure about a modification, consult with someone experienced.

Q: What kind of foundation do I need?

A: The foundation type depends on the size and weight of your structure, as well as the soil conditions. Options include concrete slabs, gravel pads, pier footings, and even a simple wooden platform. Refer to your local building codes for specific requirements.

Q: What about insulation and finishing?

A: Insulation and finishing are important aspects to consider, particularly if you plan to use your cabin or shed year-round. Different types of insulation (such as fiberglass, cellulose, or spray foam) have different R-values, indicating their thermal resistance. Exterior and interior finishing options vary greatly based on your budget and aesthetic preferences.

Happy building! I hope this guide helps you on your DIY journey. Remember to always prioritize safety and take your time. The reward of creating something beautiful and functional with your own hands is truly priceless.

Read More..

Shed Roofing Plans – Build Your Own Shed Roof

Shed Roofing Plans â€" Build Your Own Shed Roof

Constructing a shed roof is a rewarding DIY project that can significantly enhance the functionality and aesthetic appeal of your outdoor storage space. This comprehensive guide provides detailed instructions and considerations for building your own shed roof, covering various aspects from planning and material selection to construction and finishing. Whether you are a seasoned DIY enthusiast or a novice builder, this guide will empower you to tackle this project with confidence and achieve a durable, weather-resistant structure.

Phase 1: Planning and Design

Determining Shed Roof Style and Dimensions

The first step in building your shed roof involves determining the appropriate style and dimensions. Common shed roof styles include gable, lean-to, gambrel, and hip roofs. Lean-to roofs, characterized by a single sloping plane, are the simplest to construct and are ideal for smaller sheds attached to existing structures. Gable roofs, featuring two sloping sides meeting at a ridge, offer better ventilation and are suitable for larger sheds. Gambrel roofs, with two slopes on each side, provide increased headroom and storage space. Hip roofs, with sloping sides on all four faces, are aesthetically pleasing and provide excellent wind resistance. The choice depends on your shed's size, location, and aesthetic preferences. Accurately measure the dimensions of your shed's base to ensure the roof adequately covers the structure.

Calculating Roof Pitch and Material Requirements

The roof pitch, or slope, is crucial for proper water runoff. A steeper pitch facilitates faster drainage, preventing water accumulation and potential damage. The pitch is expressed as a ratio, such as 4:12, meaning a 4-inch rise for every 12 inches of run (horizontal distance). Local climate conditions should guide your pitch selection; steeper pitches are recommended in areas with heavy snowfall. Once the pitch is determined, calculate the roof's area to estimate the necessary roofing materials. Consider adding extra material to account for waste and potential errors during installation. Factor in the need for underlayment, flashing, and any necessary trim pieces.

Choosing Roofing Materials

The selection of roofing materials is influenced by factors such as budget, aesthetics, durability, and climate. Common options include asphalt shingles, metal roofing, and corrugated plastic. Asphalt shingles are cost-effective and readily available but have a shorter lifespan compared to other materials. Metal roofing is highly durable, long-lasting, and resistant to fire and extreme weather conditions, although it is typically more expensive. Corrugated plastic is lightweight, inexpensive, and easy to install, making it a suitable choice for smaller sheds or temporary structures. Research the pros and cons of each material before making your final decision.

Phase 2: Material Preparation and Cutting

Gathering Necessary Tools and Materials

Before commencing construction, assemble all necessary tools and materials. This includes measuring tapes, levels, saws (circular saw, hand saw), hammers, drills, safety glasses, work gloves, and appropriate fasteners. Materials will include lumber for rafters and supports (consider pressure-treated lumber for longevity), roofing materials, underlayment, flashing, nails or screws, and any necessary trim pieces. Ensure you have sufficient quantities of all items to avoid interruptions during the construction process.

Cutting Lumber to Precise Dimensions

Accurate cutting of lumber is crucial for a structurally sound roof. Using precise measurements obtained from your design plans, cut the rafters, support beams, and any other necessary lumber components. Employ a miter saw or circular saw for clean, accurate cuts. Ensure all cuts are square and at the correct angles to maintain the desired roof pitch. Double-check all measurements before making any permanent cuts to avoid errors that could compromise the roof's integrity.

Preparing the Roof Structure

The preparation of the roof structure involves installing the necessary support beams and rafters. These components provide the framework for the roofing materials. Ensure that all support beams are securely fastened to the shed's walls, using appropriate fasteners and techniques. The rafters should be evenly spaced and properly aligned to create a uniform slope. Employ a level to ensure proper alignment and prevent any sagging or unevenness. Consider using a plumb bob to verify vertical alignment for optimal structural integrity.

Phase 3: Roof Installation

Installing the Underlayment

The underlayment acts as a protective barrier between the roof structure and the roofing material, preventing moisture penetration. Start by attaching the underlayment to the roof structure, ensuring it is properly overlapped to create a waterproof seal. Use appropriate fasteners to secure the underlayment, taking care not to damage the material. Proper installation of the underlayment is crucial for preventing leaks and extending the lifespan of the roofing material.

Attaching Roofing Materials

The installation of roofing materials depends on the type chosen. For asphalt shingles, follow the manufacturer's instructions for proper overlap and nailing patterns. Ensure nails are driven straight and securely to prevent blow-offs. For metal roofing, utilize appropriate fasteners and sealing techniques to ensure watertight joints. For corrugated plastic, secure the sheets with screws or nails, ensuring proper overlap to prevent water penetration. Maintain consistent spacing and alignment to ensure a neat and professional finish.

Installing Flashing and Trim

Flashing is essential for preventing water leakage at critical areas, such as around chimneys, vents, and valleys. Install flashing carefully, ensuring a tight seal to prevent water infiltration. Trim pieces are used to finish the edges of the roof, providing a clean and professional appearance. Select trim pieces that complement the roofing material and install them securely using appropriate fasteners. Proper flashing and trim installation contribute significantly to the roof’s durability and aesthetic appeal.

Phase 4: Final Inspection and Finishing

Inspecting for Leaks and Defects

Once the roofing is complete, conduct a thorough inspection to identify any potential leaks or defects. Check for gaps, missing fasteners, or damaged roofing materials. Address any issues promptly to prevent future problems. A thorough inspection is crucial for ensuring the longevity and functionality of the shed roof.

Cleaning Up the Work Area

After the installation, carefully remove all construction debris and leftover materials from the work area. Dispose of waste responsibly according to local regulations. A clean and organized workspace reflects a professional and well-executed project.

Applying Final Touches

Depending on your preference, you might add finishing touches such as painting or staining the shed's exterior. This will enhance the aesthetics and provide additional protection to the wood. Consider the overall style of your property when selecting colours and finishes. Proper sealing and finishing will enhance the shed's longevity and curb appeal.

Building your own shed roof is a rewarding project that enhances your property's value and functionality. By carefully following these steps and taking necessary precautions, you can successfully construct a durable, weather-resistant roof that will provide years of dependable service. Remember to always prioritize safety and consult professional guidance if needed.

Read More..

Pallet Shed Building Plans – Cheap and Easy DIY

Pallet Shed Building Plans â€" Cheap and Easy DIY

So, you're dreaming of a shed, but the prices at the lumber yard are making your wallet weep? Don't despair! You can absolutely build a fantastic, functional shed using reclaimed pallets â€" and for a fraction of the cost. This isn't some flimsy, fall-apart project; with a little planning and elbow grease, you can create a sturdy and surprisingly stylish storage solution. Let's dive into building your very own pallet shed!

Planning Your Pallet Shed: Size and Location

Before you even think about touching a pallet, you need a plan. This isn't about grabbing a hammer and going wild (although that's tempting, I know!). The first step is figuring out the size and location of your future shed. How much stuff do you need to store? Think bikes, garden tools, lawnmowers, holiday decorations â€" the works! Measure everything you want to put in the shed to get a good idea of the necessary space.

Choosing the Right Spot

Location, location, location! This isn't just real estate advice; it applies to sheds too. Consider these factors:

  • Accessibility: Will you need easy access for a wheelbarrow or larger equipment?
  • Sun and Shade: Too much sun can damage stored items, while too much shade might lead to dampness.
  • Ground Conditions: Is the ground level and stable? You might need to level the ground before building.
  • Building Codes and Permits: Check your local regulations. You might need a permit depending on the size of your shed.

Determining Shed Dimensions

Once you know what you're storing and where you're putting it, sketch out your shed's dimensions. Remember, you're working with reclaimed pallets, so your dimensions will be dictated somewhat by the size and number of pallets you can acquire. A common size for a small pallet shed is 8ft x 6ft, but you can adjust this based on your needs and the pallets you find.

Gathering Your Materials: The Pallet Hunt!

This is the fun part (and potentially the most challenging!). Sourcing free pallets is a scavenger hunt in itself. Check local businesses â€" construction sites, grocery stores, breweries â€" they often have pallets they're happy to get rid of. Just make sure to ask permission first! You'll want enough pallets to create the walls and possibly the floor (depending on your ground conditions). Aim to collect pallets of a similar size and condition to make building easier.

Inspecting Your Pallets

Not all pallets are created equal. Inspect each pallet carefully before you bring it home. Look for:

  • Rot and Decay: Discard any pallets showing significant signs of rot or damage.
  • Pest Infestation: Check for signs of insects or rodents.
  • Broken Boards: While you can often repair minor damage, severely broken pallets are best avoided.
  • Treatment: Some pallets are treated with chemicals; try to find untreated pallets whenever possible, particularly if you'll be storing food items.

Construction: Building Your Pallet Shed

Now comes the satisfying part â€" actually building the shed! This is where having a solid plan pays off. You'll need basic tools: a hammer, saw (circular saw is recommended), nails or screws, level, measuring tape, and possibly a drill. If you are not comfortable with basic construction work, then it is best to consult with a professional.

Creating the Base

If you have a level and stable ground, you might be able to directly place your pallets for the base. If not, you'll need to build a simple base using concrete blocks, gravel, or treated lumber. This will ensure the shed doesn't sink or become uneven over time.

Constructing the Walls

Start by assembling the walls using your pallets. You'll likely need to connect pallets vertically or horizontally, depending on your design. Use nails or screws to secure the pallets together. Ensure each wall is square and plumb using your level.

Adding the Roof

For the roof, you can get creative! Plywood, corrugated metal sheeting, or even more pallets can be used. The key is to ensure sufficient slope to allow water to run off. Consider adding a waterproof membrane under your roofing material to further protect your shed's contents.

Adding a Door and Windows

This depends entirely on your design! You could create a simple door using more pallets, or you might opt for a pre-made door. Similarly, you can add windows for ventilation and light, cutting openings in the pallets and installing simple window panes.

Finishing Touches: Making it Yours

Once the basic structure is up, it’s time for the fun part â€" personalizing your pallet shed! You can add a coat of paint or stain to protect the wood and enhance the aesthetics. Consider adding shelving inside, hanging hooks, or even painting a mural on the outside. Let your creativity shine!

Commonly Asked Questions

Q: Are pallet sheds sturdy?

A: Yes, with proper construction, a pallet shed can be surprisingly sturdy. Using a solid base and securely fastening the pallets is crucial.

Q: Are pallets safe to use?

A: Always inspect pallets for rot, pests, and chemical treatments before use. Avoid using pallets that show signs of significant damage or are treated with chemicals that might pose health risks.

Q: How long does it take to build a pallet shed?

A: The construction time varies greatly depending on the size and complexity of your shed and your experience level. Allow for several days to a week, especially if you're a beginner.

Q: What if I don't have many DIY skills?

A: Start small! Building a tiny shed is a good practice run for a larger structure. If you feel totally overwhelmed, consider seeking help from a more experienced DIYer or a professional builder.

Q: Do I need any specific tools?

A: A hammer, saw (preferably circular saw for quicker work), nails or screws, level, measuring tape, and possibly a drill are essential. Safety glasses and work gloves are highly recommended!

Building a pallet shed is a rewarding project that allows you to create something useful and unique while saving money. Remember to prioritize safety and plan carefully. Happy building!

Read More..